Text Size
To control the size of the font used in your text, you can use headings. These commands all begin with a left handed pointed bracket and end with a right handed pointed bracket.
In between, there is an "H" followed by a number between 1 and 6; the larger the number, the smaller the text.
This is the size of <H1>.
This is the size of <H2>.
This is the size of <H3>.
This is the size of <H4>.
This is the size of <H5>.
This is the size of <H6>.
Another way to affect the size of text is to use a command, "font size". This allows you to increase
or decrease the size of the font relative to the currently selected size. The format is <font size = +x> or
<font size = -x> where x represents the increment or decrement in size. When you want to return to the original font, you need the command </font>.
If we begin with <H4> size text, this is the effect of increasing the font size by 1, this is the effect of increasing the font size by 2,
this is the effect of increasing the font size by 3, this is the effect of decreasing the font size by 1, this is the effect of decreasing the font size by 2, and this is the effect of decreasing the font size by 3.
Text Effects
In addition to size, we discussed the use of italics and of bold text. When we want text in italics,
we block the text with the commands <i> and </i> (in pointed brackets, of course). Then, the text would appear as
this does. To get bold text, we block the text with <strong> and </strong>. Then, the text would appear as
this does. (This has more impact with different fonts).
Spacing
Within HTML, the text will continue to wrap until you tell it not to do so. There are two basic options,
"move to the next line" and "leave some space after the move to the next line." These are represented by the commands <br> and <p>, respectively.
If we move just
to the next line, we use <br>.
The use of <p> leaves additional space as above.
In addition, HTML will move to new lines when you use one of the "h" commands to affect the size of the
text as it did just now. Use of the <font size=...> command does not move the
text to the next line. Similarly centering text will cause lines to be skipped, even without the normal line changes.
Another way to demark spaces between text is with the line command. In its simplest form, it is just <hr>. The result is that etched
line shown below.
Text Font
We did not discuss changing the font last class. However, you can use any of the true type fonts with the command
<font face="name of font">. This document uses <font face="Arial">.
You can change to any font for some of the text by putting the <font face = ...."> command in the front of the text you want to
change and, of course, the </font> at the end. This new font is called "Therapy 2." If you want the entire document in a font, just put the command at
the top of the document.
Text and Background Color
A second thing we did not discuss in class was changing the text color. The default is black, with linked items in blue. Of course,
the user could change that default. If you want the entire document a different color font or background, you can change
it in the "body" command. In this command, you can change the color of the background by using the "bgcolor" option,
the color of basic text by using the "text" option, the color of links with the "link" option and the color of visted links with the
"vlink" option. After the key word for each (or any) of these options, follows "=#" and a six character code for the color. These are stated in
hexidecimal code and provide a unique amount of red (the first two numbers), green (the second two numbers) and blue (the third two numbers)
saturation.
For this document, the command was:
<body bgcolor=#FFFFcc text=#8E2323 link=#4E2F2F alink=#009900 vlink=#ff0000>
between pointed brackets, of course. You can play with the number combinations until you find one you like, or
you can use the "Color Help" page for guidance. Remember that different
computers might see these colors differently depending upon the options set for the video. These same numbers can be used to specify the background color.
The pale green of this screen is set with the <bgcolor="#BDE7B7"> command.
Of course, you can change the color of specific text individually too. That color was #009900. This helps to
highlight specific ideas. To change particular text, precede the
text with the command <font color="#xxxxxx"> and place a </font> at the point where you want to return to the basic color for the page.
Remember, these fonts numbers are in a computer numbering scheme referred to as hexidecimal (which simply means base 16), so they can look
unusual; the number for the red is ff0000. Be careful about mixing too many colors.
If you would rather control the background color with a graphic, then do it. You specify this in the "body" command
as well. You can use it alone, such as that below,
<BODY BACKGROUND="http://www.umsl.edu/~sauter/graphics/grayback.gif">
or with the colors noted above,
<body bgcolor=#FFFFcc text=#8E2323 link=#4E2F2F alink=#009900 vlink=#ff0000 background="grayback.gif">
Hypertext Links
One thing that makes the World Wide Web special is its ability to link to other sources immediately. This is done with
hypertext links. The command tells the page what words or images to link, and what page to load if the link is selected.
As with many HTML commands, it has a beginning and an end. The words or images between the two are the "hot" links, or the places
where a person may click a mouse and move directly.
At the beginning, you provide the notation that a link is coming with <a href="......">. At the end of the text or
image that you want connected, you provide the ending command, </a>. The .... in between the quotes refers to
the URL of the page you want connected. If you wanted to skip to the MSIS 480 home page, you would provide the command
<a href="http://www.umsl.edu/~sauter/480"> at the beginning and </a> at the end of the text linked (which, in this case was everything after the word "command" and before this
parenthetical statement).
You can use absolute links by providing the full URL (including the http:// at the beginning) of the page. This is safe to be sure you always get
to a particular page, even if you just copied the link from somewhere else.
You can use relative links by providing the URL in terms of the location of the page referencing the URL. In our case, since
this page is on the same server, and in the same directory and subdirectory as the MSIS 480 syllabus, you could state the URL as
<index.html> instead of the entire URL. If the desired page is in a different directory, such as my main
home page, you can also state the directory structure. In the case of my home page, it could be stated as </~sauter/index.html>. This allows you
to reference pages within your own directory easily, even if you change the host of the web pages.
You can also have "external" links and "internal" links. External links go to some other page, and use the notation shown above. Internal links
provide navigation within a page, such as the index links at the top of this page. To use an internal link, you must first "name" the location
to which you want to link. This is done with the <a name="...."> command at the beginning of the location to which you want to link, and the </a> link at the end of the location
to which you want to link. For example, the heading of this section, Hypertext Links, really appears as
<a name="links"> Hypertext Links </a>
This identifies a specific location on the page to which anyone could link directly.
To provide that direct link internally, you use the "#" to indicate that the location is a named location. Hence, to link to it directly, you would have the code
< a href="#links">such as
<a href="#links"> Hypertext Links </a>
where the text in green actually appears between pointed brackets.
To use this special location from another page, you would simply use the entire URL with the new information
<a href="http://www.umsl.edu/~sauter/480/primer.html#links"> Hypertext Links </a>
where the text in green actually appears between pointed brackets.
One special form of link is the <a href="mailto:.....> link. This allows the user to send email to the specified account automatically with the click. The
information between the quotes is your email address. For example, I might use "mailto:Vicki.Sauter@umsl.edu" to allow mail to come to me.
The full form of the command is <a href="mailto:Vicki.Sauter@umsl.edu">. Of course, as with any
hypertext reference, you must finish it with </a>.
Use these links a lot to help explain your page, or to provide more information about topics you have selected.
Images
The final topic we discussed in class was the use of images. These can be located in your own directory, or can be referenced from
someone else's directory. The primary key words are <img src="....."> where the URL for the
image is located between the quotes. So, for example, when using the UMSL logo, you would use
<img src="http://www.umsl.edu/images/stlogo.GIF">
and you would see  . .
There are some options you can invoke to affect how that image appears. One is the alignment, indicated by the keyword "align" to control either the
vertical alignment,
top
middle
bottom
or the horizontal alignment,
right |
left |
You can also control the size of the image with the "width=" and "height=" options in the image command. For example, the
UMSL logo above had a width=72 and height=95 as shown in
<img align="right" src="http://www.umsl.edu/images/stlogo.GIF" WIDTH="72" HEIGHT="95">
You could make it smaller by adjusting one of these, say the width=35
<img align="right" src="http://www.umsl.edu/images/stlogo.GIF" WIDTH="25"
or the height=55
<img align="left" src="http://www.umsl.edu/images/stlogo.GIF" height="55"
or by specifying both of them. This might be particularly important if you use an image from someone else's page.
Finally, it is good form to specify some text equivalent that could be displayed if the image is not displayed (either because
it is not available, or because the user has turned off the automatic loading of images. To do this, specify the option alt="..."
where the text between the quotes would be displayed. In our case, we might have alt="UM-St. Louis" to be displayed in the
absence of the UM-St. Louis logo.
Some sources for images are:
Clip Art Collection
Tips for Graphic Designers
Icon Library
UMSL GIF's
Image Collections
IconBazaar
Documentation
Always, always document your page. Some versions of browsers do not print out the URL with the page. In those circumstances, unless you have
it stated on your page, someone would not know how to find your page again. Furthermore, the page might be loaded into a "frame" of another
Web page. In this cirucmstance, the user would not know how to find your page again without the documentation.
Generally, the documentation should include at least the URL, the page owner and how to contact that person, and the last time the page was updated. The form that I use most often is:
| Go to UM-St. Louis Home Page | College of Business Page | IS Home Page |
This page was last modified on: Sunday, June 17, 2001 01:18:40 *
URL: http://www.umsl.edu/~sauter/help/primer.html *
Page Owner: Professor Sauter (Vicki.Sauter@umsl.edu)
© 2001, Vicki L. Sauter. All rights Reserved.
Tables
Use of a table is the best way to get control over the location of items on
the page.
The first command for a table is: <table>. This tells html that you are about to define a table format. If you just use <table> then you will have a basic table with no borders (or lines between cells), and will be sized as a function of the size of the longest text, the largest image and/or the size of the window in which the browser is open. Generally, that is bad. The following options allow you to control some of those features as shown below.
| <table> | without any other statement simply
places the text in a table format |
| <table border=3> | puts borders around the cells
the larger the number, the thicker the border |
| <table border=3 size=100%> | puts borders around the cells
and uses the entire width of the window in which the browser is open |
| <table border=3 width=20> | puts borders around the cells
and uses only 20 pixels of the window (regarless of how much is open) |
Each row of the table must be declared by having the command <tr> at the beginning of the definition of the row and </tr> at the end of the definition of the row.
Each cell of the row must be declared by having the command <td> at the beginning of the definition of the cell and </td> at the end of the definition of the cell.
Hence, the syntax for the last table above is:
| <tr> | <td> .... </td> | | <td> .... </td> | | </tr> |
| </table> | | | | | | |
The width and height of individual rows or individual cells can be controlled by using the "height" and "width" options associated with the "tr" and "td" commands, respectively--regardless of whether you used them with the table command or not. This gives you further control of the look of your table.
<td width = 50> | <td width = 150> |
Within the cells, you can use any and all of your html commands. As shown in the sample page, you can embed graphics, hypertext links and different font styles. In fact, unless you define a font style, a font size and a font color, the text will convert to the default in the cells of the table. Hence to get the table above, we used the following commands in each cell:
<td width=50> <font face="Arial"> <font color="#ff0000"> <center>
You can also change the background color of a cell using the "bgcolor" command with the appropriate RGB after it. For example, to have the first column red,
This is text | use the command
td bgcolor=#ff0000 |

| use the command
td bgcolor=#ff0000 |
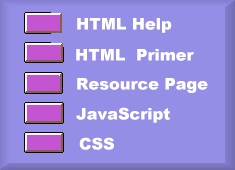
The graphic above is what we call an "image map." It allows the designer to create regions on which the user can click and activate a hypertext link. There are three critical documents that must be identified: (a) the page; (b) the graphic; and (c) the map. The page is simply the document on which the graphic is displayed. In the case of this document, it is http://www.umsl.edu/~sauter/480/primer.html. One creates this page generally in the same fashion as any other page. What is different is how you define this particular entry. In this example, the underlying code is:
<a href="http://www.umsl.edu/cgi-bin/imagemap/~sauter/help/sample.map">
<img align="bottom" src="http://www.umsl.edu/~sauter/help/graphics/map_example.jpg" ISMAP border="0">
The first line identifies the location of the instructions for interpreting the graphic, called a map. This particular one is located in the 480 subdirectory of the ~sauter account and is called "sample.map". The new requirements for the URL are to use the keywords, "cgi-bin/imagemap" between the node and the account to tell it to interpret it as an imagemap.
<a href="http://www.umsl.edu/cgi-bin/imagemap/~sauter/480/sample.map">
The keywords (indicated in red here) must appear as shown.
In the second line of the new code, you identify your image as you would any other image. However, you must specify the option, "ISMAP", to tell the browser to interpret it as a map.
The second document is the graphic itself. This can be any image that is located in the user's directory. In this case, the image is located at http://www.umsl.edu/~sauter/480/graphics/map_example.jpg. After creating the image, you must define the corner points of the region on which you want to create the hyperlinks. If you do not have a graphics editor, you can look in Netscape by moving the mouse to the position, and noting the coordinates on the status bar at the bottom. Of course, this only works after you have defined it as an image map. Hence, if you have no clue, then just put down anything, check it in Netscape, and fix the map. In this example, the entire region located within the orange boxes will be linked. This means the user can click on the button, the words, or somewhere near, and still have the same effect.
The third document is the map itself. This document is a text file with the specifications for the regions and the document to which each region is linked. For example, for the image below, the map appears to be:
rect http://www.umsl.edu/~sauter/help/Links_HTML.html 16,8 226,39
rect http://www.umsl.edu/~sauter/help/primer.html 16,40 226,71
rect http://www.umsl.edu/~sauter/help/index.html 16,72 226,100
rect http://www.umsl.edu/~sauter/help/Links_java.html 16,101 226,127
rect http://www.umsl.edu/~sauter/jelp/Links_CSS.html 16,128 226,160
default http://www.umsl.edu/~sauter/help/primer.html#map
Please note there are NO pointed brackets anywhere in this image map. It appears exactly as you see it.
The keyword, "rect," indicates that the region being identified is rectangular. (If your region is irregular, then use the keyword "poly".) The numbers at the end of each line identify the left, upper coordinates (separated by a comma) and the right, lower coordinates (separated by a comma) of the region. Note there is only a space between the two sets of coordinates. (If you used the polygon option, you must specify the set of coordinates of each vertex.) The URL in between identifies the page to which the browser should move with the click. In addition, there is a default region defined in the event that the user clicks on some region other than the ones identified.
For more information about developing Web Pages, please visit my Links to HTML Help Page.
|